School of CC


Here at CC Imaging we want to help you get the most out of your images. You will find below a series of Photoshop tutorials that take you step-by-step through the colour correction process, identifying colour casts and more.

We welcome customer feedback on our guides, so if you would like to see a particular topic covered just ...

Down to Basics

New to Photoshop tutorials or placing orders? Start here!


How to embed colour profiles for prints up to 18 x 12 inches

50 Shades

Embedding a colour profile.

This Photoshop tutorials will cover embedding the correct colour profile and making sure your image fits your required print size. Please note that this guide is only relevant to images you wish to print up to 18×12 inches. For larger size printing, please see Poster Prints; for Giclée printing please see Giclée Prints.

Installing the colour profile
For C-Type printing up to 18×12 inches please download this icc colour profile.

PC

1: You will now see CC Imaging – Standard.icc stored on your desktop.
2: Right click profile icon and click install.

Mac

1: You will now see cc-profile.icc on your desktop.
2: Go to FINDER in your dock
3: Go to the LIBRARY folder and double click
4: Find the COLORSYNC folder and double click
5: You will see the PROFILE folder appear.
6: Drag and drop the CC Imaging – Standard.icc profile from your desktop into the PROFILE folder.

Embedding the colour profile

To convert your image to our colour profile in Adobe Photoshop, follow the instructions below:

1: Open Adobe Photoshop.
2: Open an image.
3: Click on EDIT.
4: Click on CONVERT TO PROFILE.
5: Click on DESTINATION SPACE.
6: Select the CC Imaging – Standard.icc profile from the drop down list.
7: Click OK.

How to embed colour profiles for Giclee printing

Fabulous Fine Art

Embedding a colour profile for giclee prints.

The correct colour space must be embedded in each of your files. We use the Adobe RGB1998 colour profile for Giclee output as it offers closer accuracy when matching to your calibrated screen. To convert your image to this colour profile in Adobe Photoshop, follow the instructions below:

1: Open Adobe Photoshop.
2: Open an image.
3: Click on EDIT.
4: Click on CONVERT TO PROFILE.
5: Click on DESTINATION SPACE.
6: Select the Adobe RGB 1998.icc profile from the drop down list.
7: Click OK.

Border Adding a border to ensure enough white space surrounds your image is a necessary part of file preparation. Having profiled and cropped your image in Photoshop:

1: Click on EDIT.
2: Click on IMAGE SIZE.
3: Increase the WIDTH and the HEIGHT to your preference.
4: Select appropriate CANVAS EXTENSION COLOUR.
5: Click OK.

If you require exact trimming to a white edge, please go through the above steps a second time adding 0.2inch of black to your image. The resulting image will be your cropped image + your extra white space + a black key line. We will then trim off this black key line, leaving the print at the correct size.

Using WeTransfer to send us an order

Together WeTransfer

A few clicks and away your order goes.

Until we launch our online ordering system, WeTransfer is one of the best way to send us your order. It is ideally suited to our Economy photo printing service, but there is a little bit of prep work required to ensure everything works smoothly. If you are familiar with WeTransfer you may want to skip ahead to ‘organising your files’

What is WeTransfer?

wetransfer

WeTransfer is a super simple way to send up to 2GB worth of files, images, music, video..etc.. You don’t need an account and can send files to anyone’s email address. All you need is your email address, the recipient’s email address, the files you wish to send and a short message about what you’re sending. That’s it!

Need a bit more info?

It’s as simple a 1,2,3 (4,5,6). Check out the screenshot below. This WeTransfer box is what you will see when you go to their website. Just follow the steps and away you go! Remember to include a completed job sheet as one of the files you send us. We can take payment for your order over the phone via credit/debitcard, so your phone number would probably be very useful too!

wetransfer upload step-by-step guide

Please outline on your job sheet what size your prints need to be, the quantity at each size and what paper finish you would like.

It may also be a good idea to name your images with the size you would like them printing i.e. “6×4 in oo1.jpg”, “6×4 in 002.jpg”, “18×12 in 001.jpg”. Sequential numbering prevents one image overwriting another image with the same name.

What is Dropbox

Travelling Without Moving

Folders, files & shares always at arms length.

Until we launch our online ordering system, Dropbox is one of the best way to send us your order. It is ideally suited to our Economy photo printing service, but there is a little bit of prep work required to ensure everything works smoothly. If you are familiar with Dropbox you may want to skip ahead to ‘organising your files’

What is Dropbox?

dropbox logo file sharing online orderingDropbox is an online system for creating folders and saving files. This system, and similar ones offered by Google, Apple, Microsoft …etc…, are commonly referred to as ‘Cloud’ services. The idea is that you create a free account with Dropbox, who provide you with a small amount of storage space. Within this storage space you can create folders and upload files. Dropbox can be accessed through your internet browser, an app on your phone or even installed onto your computer.

Choosing to install Dropbox onto your computer is a great way to start sharing files with us, sharing as part of an order process that is. Anyone familiar with using a computer will immediately feel at home using Dropbox after installing it on their computer. Dropbox creates a special folder on your computer and watches it. Whenever you drag & drop a file or folder into this special folder, Dropbox will begin to upload a copy of it to your online Dropbox storage space. In fact, the special folder on your computer is an exact mirror image of your online storage, what is in one is also in the other.

To begin using Dropbox, please create your free account here. Remember to install Dropbox onto your computer, you will be asked to login to your Dropbox account when you install the software. Don’t worry, it won’t keep asking you. Check out the video below for a step-by-step guide to installing and using Dropbox.

Thanks Tesco 😉

Using Dropbox to send us an order

Into The Ether

Making sure the right files go to the right place.

The best method of sending us an order via Dropbox is to use your computer with Dropbox installed. There are several steps and a ‘best practice’ to ensure your order is clear to understand and we receive all your files properly.

If you have not yet created a Dropbox account, please see this guide.

Creating a Root Folder

A root folder sounds fancy, but really it just means a starting folder or ‘home’ folder where all other folders will live. Folders are a bit like family trees, having parents, children and siblings. As we can see below, how we organise folders sounds complicated but in reality it’s pretty simple stuff.organising folders and image files

Sending your order

On to the important stuff. Follow the steps below and soon you will be a pro when it comes to sending us orders.

  1. Browse your computer and open the special Dropbox folder.
  2. Create a ROOT FOLDER. This should be titled CC Imaging – “Your Name”. Remember to replace “Your name” with your , er, actual name. You don’t need to include the ”  “.
  3. Immediately after creating this folder, right click it and select ‘Share this folder…’.dropbox_share
  4. You will be taken to the Dropbox website where you can type in our email address to share this folder with us. Please type in…contact
  5. After sharing the link to your folder, you can close the internet browser window and return to your ROOT FOLDER.
  6. Now back at your ROOT FOLDER, open the folder and create an ORDER FOLDER. This is an easy way to separate your current order from your last order (so we don’t all get confused).
  7. Make sure to name your ORDER FOLDER like this… “My Name” 07-01-15. The name + date format is a necessity! Please use the correct date.
  8. Now open your ORDER FOLDER and create 1 new folder for every size of print (or type of print for example a Fine Art print).organising image files into folders
  9. Having cropped your images to the correct size, at 300dpi and embedded our colour profile… drag and drop your image files into their respective folders.adding files to folders
  10. That takes care of uploading your images.


House keeping

It is important to remember that you only have a limited amount of space for your Dropbox account. With this in mind, it is a good idea to delete old orders every 2 weeks (or sooner if you’re really low on storage space). Most importantly, DO NOT delete your ROOT FOLDER. This is permanently shared with us to make your life easier. If you do delete it, you will need to go through the steps above to re-create and share a new ROOT FOLDER with us.

What to do next?

In addition to you sending us your image files via Dropbox, you will need to send us an email with an attached (and completed) job sheet. This job sheet will act as your order and also a check list to ensure we print your whole order and that quantities and sizes match up with what you sent us via Dropbox.

  1. Download our job sheet word document.
  2. Open the job sheet using Word or an alternative application compatible with Word documents such as WPS Office Free for Windows.
  3. Click the boxes to edit and fill out your order.
  4. List the print sizes and the quantity required at each size.
  5. In the reference box, please use the ORDER FOLDER name which relates to this job sheet i.e. “My Name” 01-07-15.
  6. Once finished, save and then attach the job sheet to an email and send it to us.

Let’s Beautify

Making Photoshop work for you.


Cropping in Photoshop

Made to Measure

Correctly sizing your files.

It is necessary to send us files cropped to your desired output size. If you would like to order a 6×4 inch print, sending an image cropped to 6×4 inches guarantees the resulting print will contain the whole image area.

Get your crop on

In this tutorial, the following steps will crop your image to 6×4 inches using Adobe Photoshop CS5.

1: Open your image.
2: Choose the CROP TOOL (shortcut: press the C key on the keyboard).
3: At the top of the screen you will see these cropping options…

crop_tool
4: Click on the Width box and type in 6in (please note you must also type ‘in’ to set your units of measure to inches).
5: Click on the Height box and type in 4in (please note you must also type ‘in’ to set your units of measure to inches).
6: Click on the Resolution box and type in 300 (make sure the drop down is set to pixels/inch).
7: Press ENTER/RETURN on your keyboard to OK these settings.
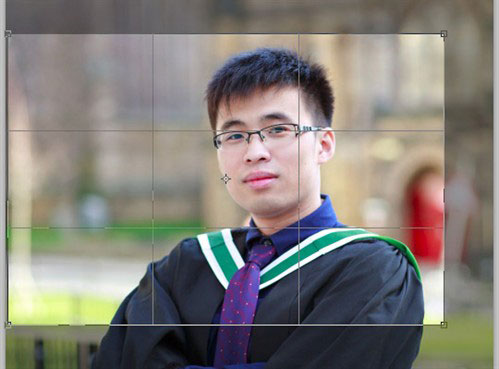
8: Move your mouse cursor over your image and click and drag the mouse on top of the image to create a crop region (as seen below).   crop2 9: You can expand or reduce the size of this region by moving the anchor points located at each corner of the selection. You can also reposition the region by clicking and dragging the centre of the selection.
10: When you are happy with the position of the cropping region, press ENTER/RETURN on your keyboard to finish cropping the image.

If at any time during cropping (when you are dragging and resizing your cropping region) you are not happy, you can press the ESCAPE key on your keyboard to cancel cropping. If you have already cropped your image and decide you wish to re-crop it, Undo the crop by selecting EDIT from the top menu and then UNDO CROP. Alternatively, you can press Control + Z (Command + Z on Mac) to undo the crop via the keyboard shortcut.

USEFUL INFORMATION
DOWNLOAD COLOUR PROFILES
Profile Used For
   
CC Standard C-Type up to 18×12″
Epsilon Matte C-Type over 18×12″
Epsilon Gloss C-Type over 18×12″
   
Adobe1998 Giclee Printing
   

The Adobe RGB profile should already
be installed on your system

PRINTABLE JOB SHEETS
File Post / Collect Orders
   
Job Sheet Editable Word doc
Job Sheet Write by hand
   

Please include one of the above
when sending an order through
the post or dropping off for
collection. Thank you.

Tooling Up

Image editing requires a gentle touch.

It is important to use the best tool for the job. If you truly want to get the best out of your image editing, you will need something more sophisticated than a mouse. Working with a mouse within Photoshop can be quick for certain tasks, but where it really matters, the ‘fully on’ or ‘fully off’ nature of a mouse makes it less than ideal.  Graphics tablets are the industry standard tools for editing images professionally. Sometimes called digitiser tablets, many brands and sizes are available such as the Intuos range from Wacom, Huion 610 and Trust .

Smaller digitiser tablets can be bought for around £40.00, something like the Intuos Pro Medium would cost approximately £240.00. Some people find the disconnect that occurs when using a graphics tablet off putting. There is quite a steep learning curve to drawing on a tablet whilst looking at a screen. Wacom also produce a range of tablet displays called Cintiq. This fuses the sophistication and naturalness of using a pen with a display, you literally draw on the screen to edit your images.

Having used Wacom’s Intuos tablets for many years, we trailed the Cintiq, but even we found it hard to justify the £1500.00 spend (though they are beautiful). If you have watched any of our Photoshop tutorials, you will have seen a great alternative in action. We took a punt on a Wacom Cintiq alternative from a company called Bosto. We specifically chose the 22HDX model due to having express keys on either side of the screen. Express keys can be mapped (programmed) to work like keyboard short cuts, which are really important as time is money. So far the 22HDX has been working out great. At 1/3 the price of a Cintiq or twice the price of an Intuos, the Bosto represents a sweet spot for those who need a graphics tablet and a colour accurate screen.

Bosto 22HDX Review

This 22in tablet display from Bosto provides great sRGB color accuracy and 2048 levels of pressure, making it an ideal tool for any serious digital photographer. Check out our review to see how well it copes with Photoshop.

--->