Bosto 22HDX Calibration
December 23rd, 2014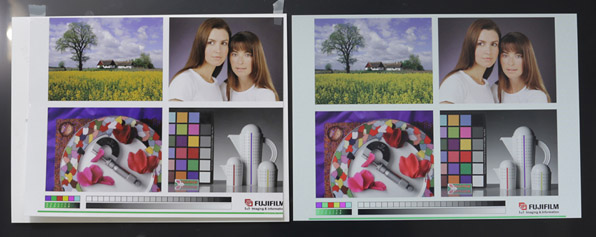
Hey folks, between the Christmas deadlines we managed to unwrap our new Bosto tablet display. It’s a thing of beauty! But it would be pretty useless if it didn’t accurately display colour. So began the quest of calibration and the results speak for themselvesas accuracy is easily on par with our LaCie Electron Blue 22 IV! I must confess that it did take a while to calibrate due to slightly awkward button configuration on the tablet itself, but as you can see it was worth the effort.
On the left is a Fujifilm test chart printed through our Frontier 570 minilab (with no auto or manual colour correction). On the right is the same image opened in Photoshop, as displayed by the Bosto 22HDX. The colour accuracy is very close and well within tolerance. Density is arguably better than colour accuracy but this is likely due to unflagged tungsten light spilling onto the print (nudging the colour temp to the warmer side).
About the process:
The Bosto 22HDX was on for 2hrs before being calibrated with an i1 Match Pro. Gamma 2.2 was achieved (by leaving gamma disabled, strangely), colour temperature was set to native (after several calibrations using a series of temps), brightness and contrast were set to calibration tolerance (this could differ for alternate calibration hardware) as part of the calibration process.
After calibrating the Bosto with the i1, we printed the Fujifilm test chart and taped it to the screen (magic tape!). A daylight balanced LED panel was used to provide stable lighting (though we didn’t flag the screen) so we could get decent neutral colour reflected from the print.
To ensure the Bosto was displaying colour and density as close to our print workflow as possible, fine tuning was made via the monitor buttons. R, G, B channels were tweaked as was brightness and contrast. We are now happy to use the Bosto 22HDX as our main screen for editing, replacing both the Lacie monitor and Wacom Intuos 5 M tablet.
